Photo by Out Of Focus | Title - Brief Tutorial - Vertorama
f8.0 | focal length : 11mm | ISO 100 | shutter speed : 1/1000 | flash : not fired
| Photographer said.. |
I was always told not to be karet with knowledge. So what if one does it better than you. You should be proud that it was because of you that that some one has blossom to what he has become. You should be happy that some one has taken the time to learn from you.
This is an attempt to explain how I did my vertoramas. I think there is a better description of it on the web somewhere but this one is how I went about doing it.
I wasn't planning on doing this photo because of the distracting lamp post and fishing nets in the middle of the photo but I love the way the clouds display itself that day. So here goes...
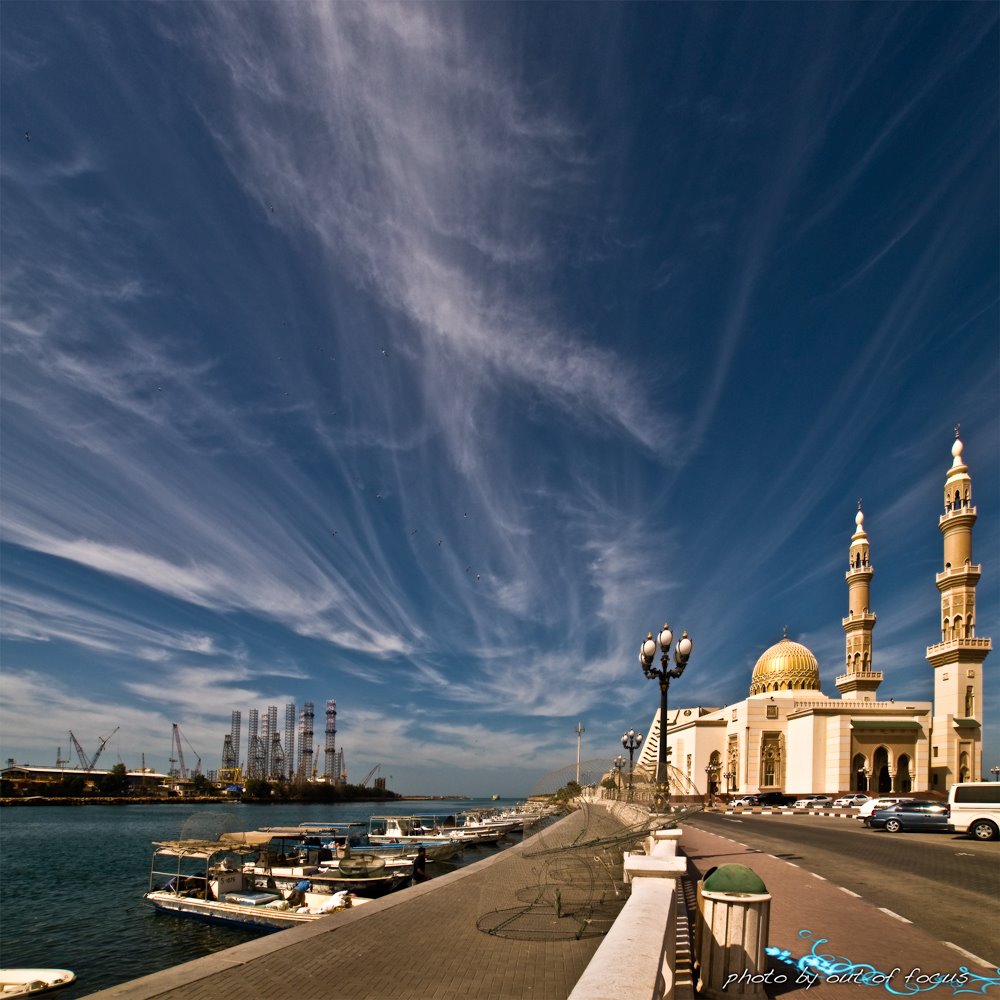
First, after some tweaking in Lightroom, I opened up the images in CS3 and then put them on a new squared canvas with a slightly larger size then the image itself.
 (click on photo for larger)
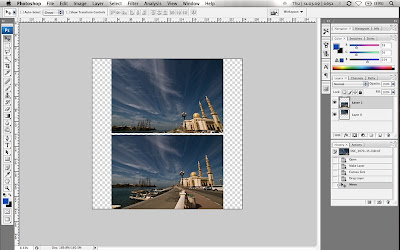
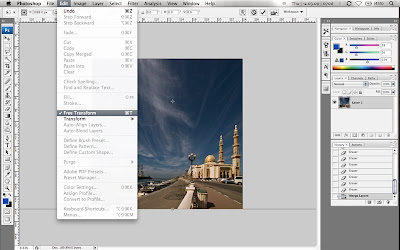
Then I set the opacity to a lower value so that I can see through them. This was so that I can arrange them nicely together. Using the transform, distort function, I stretched the photos so that they almost align together. You an see from the bottom image that there is a line where the first photo meets the other.
 (click on photo for larger)
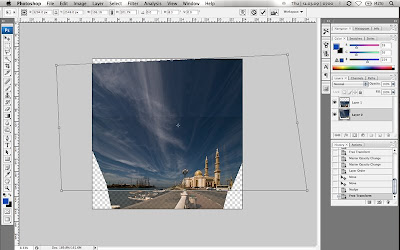
I then set the opacity back to 100%, and using the level function, I tweaked on of the photo so that the brightness match as close as possible to the other photo.
Now that they are closely matched, I used the eraser tool to erase the edges of the photo. This takes a bit of time. Use a low opacity eraser and a large brush and slowly erase bit by bit then work down with a smaller brush.
This particular photo is easy to stitch because clouds are not as difficult as if you are trying to stitch buildings.
Once you're happy, merge the photos together.
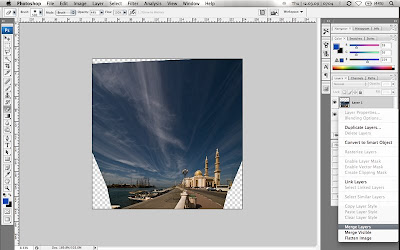 (click on photo for larger)
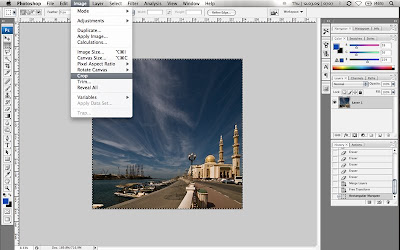
Transform the photos again to fill your canvas, then select the frame and crop because by this time, if you haven't already notice, your image size is big!! I started with 189mb and ended up with over 700mb. Hehe!! So its best to discard the non visible area.
 (click on photo for larger)
Once you're done with it, then you can start tweaking up the colors again to your liking.
Hope this short tutorial helps guys.. No more alasan ah.. Hehehe!!

| Photographer said.. |
I was always told not to be karet with knowledge. So what if one does it better than you. You should be proud that it was because of you that that some one has blossom to what he has become. You should be happy that some one has taken the time to learn from you.
This is an attempt to explain how I did my vertoramas. I think there is a better description of it on the web somewhere but this one is how I went about doing it.
I wasn't planning on doing this photo because of the distracting lamp post and fishing nets in the middle of the photo but I love the way the clouds display itself that day. So here goes...
First, after some tweaking in Lightroom, I opened up the images in CS3 and then put them on a new squared canvas with a slightly larger size then the image itself.
 (click on photo for larger)
Then I set the opacity to a lower value so that I can see through them. This was so that I can arrange them nicely together. Using the transform, distort function, I stretched the photos so that they almost align together. You an see from the bottom image that there is a line where the first photo meets the other.
 (click on photo for larger)
I then set the opacity back to 100%, and using the level function, I tweaked on of the photo so that the brightness match as close as possible to the other photo.

Now that they are closely matched, I used the eraser tool to erase the edges of the photo. This takes a bit of time. Use a low opacity eraser and a large brush and slowly erase bit by bit then work down with a smaller brush.
This particular photo is easy to stitch because clouds are not as difficult as if you are trying to stitch buildings.
Once you're happy, merge the photos together.
 (click on photo for larger)
Transform the photos again to fill your canvas, then select the frame and crop because by this time, if you haven't already notice, your image size is big!! I started with 189mb and ended up with over 700mb. Hehe!! So its best to discard the non visible area.

 (click on photo for larger)
Once you're done with it, then you can start tweaking up the colors again to your liking.
Hope this short tutorial helps guys.. No more alasan ah.. Hehehe!!

5 comments:
hahaha..thanks man.
U actually made a tutorial.Awesome.
awesome... will try this sometime... will it work on group photos as well.. lol
and I'm liking the photo.. ;)
I think it should, God (man.. this is weird..). Try avoiding the people's head when merging.. Hehe!!
VM.. waiting for ur Vertorama dude.. Hehe!!
wow..nicely done here...bagus-bagus *thumbs up*.. hehe :)
tutorial yang menarik. thanks for sharing.
Post a Comment