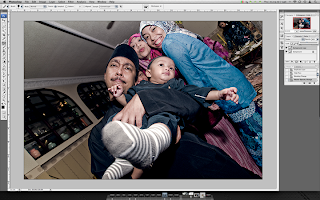
Photo by Out Of Focus | Title - A Brief Tutorial - Wax Effect
f7.1 | focal length : 11mm | ISO 100 | shutter speed : 1/160sec | flash : fired

| Description |
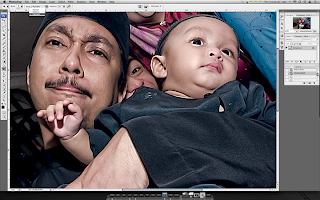
Now that I've got some time on my hand, I thought I might as well do this tutorial on that Dave Hill thingie. Although we established that it didn't look like it, you guys still want to know how I did it. Dudsy thought it looked like Madame Tussaud's wax model and I liked the idea so I'm going to call it the wax effect.
One thing I'd like to say is that to do this, your photo has to be in good lighting conditions. Kalo inda, effectnya inda berapa. I tried it on different photos and you saw my previous posts on this. Not all are the same. So remember, if it didn't work on yours, don't blame the technique. Blame your photo. Hehehe!!
Enough yapping, here we go...
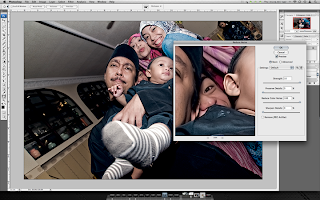
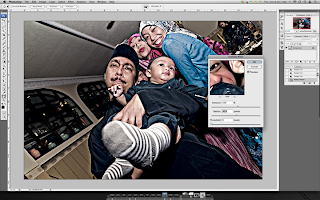
Open up your file and edit it for levels, saturation and all the stuff (macam ilangkan jerawat batu) you normally do on a portrait photo. After that's done, duplicate it and then select filter, other, high pass and set the radius to around 4-5.. I used 4 for this.
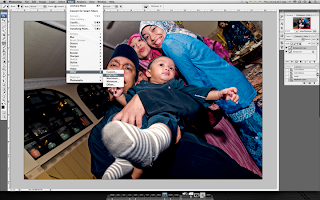 [ click on image for larger ]
Set the layer blending mode to vivid light and then flatten the image.
 [ click on image for larger ]
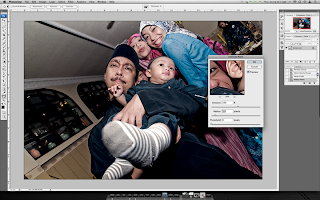
Duplicate the layer again and then the same thing with filter, other, high pass this time radius to 6-7. Set layer blending to color and reduce the opacity to 40%.
 [ click on image for larger ]
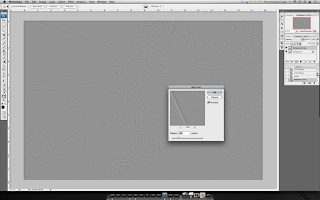
Set layer blending to color and reduce the opacity to 40%. Flatten image again. Now go to filter, noise, reduce noise with the following settings (click on image below).
 [ click on image for larger ]
Then use unsharp mask to sharpen the image using a radius of 1-2px. I used 1.5 for mine.
 [ click on image for larger ]
Now we fix the whites.. Use the dodge tool, set it to highlights and use a small brush and exposure to whiten the eyes and teeth. Do this slowly because you don't want to over do it (not that its overdone already) and make it look freaky.
 [ click on image for larger ]
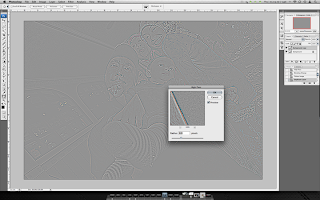
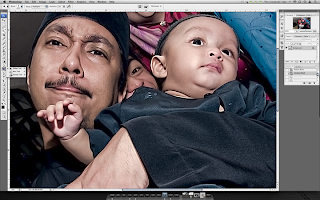
Reduce the noise again. Now comes the fun bit. Sharpen it again but this time use a radius of 30 px. You can increase or decrease it a little depending on how you like it and WAALAAA!!
 [ click on image for larger ]
What I did next was reduce the noise again and sharpen it to 1.5 px radius just to clean it up a little. And then the usual tweaking of levels, saturation and other bits and pieces.
So there you have it, hope you likes but mostly understand. Write in the comment box if you have questions, but don't say it didn't work when you do it. Remember.. DON'T BLAME THE TECHNIQUE!! Hehe..
| One other thing.. |
Do tell me if you did one. I'd like to see the outcome..

| Description |
Now that I've got some time on my hand, I thought I might as well do this tutorial on that Dave Hill thingie. Although we established that it didn't look like it, you guys still want to know how I did it. Dudsy thought it looked like Madame Tussaud's wax model and I liked the idea so I'm going to call it the wax effect.
One thing I'd like to say is that to do this, your photo has to be in good lighting conditions. Kalo inda, effectnya inda berapa. I tried it on different photos and you saw my previous posts on this. Not all are the same. So remember, if it didn't work on yours, don't blame the technique. Blame your photo. Hehehe!!
Enough yapping, here we go...
Open up your file and edit it for levels, saturation and all the stuff (macam ilangkan jerawat batu) you normally do on a portrait photo. After that's done, duplicate it and then select filter, other, high pass and set the radius to around 4-5.. I used 4 for this.
 [ click on image for larger ]
Set the layer blending mode to vivid light and then flatten the image.

 [ click on image for larger ]
Duplicate the layer again and then the same thing with filter, other, high pass this time radius to 6-7. Set layer blending to color and reduce the opacity to 40%.

 [ click on image for larger ]
Set layer blending to color and reduce the opacity to 40%. Flatten image again. Now go to filter, noise, reduce noise with the following settings (click on image below).
 [ click on image for larger ]
Then use unsharp mask to sharpen the image using a radius of 1-2px. I used 1.5 for mine.
 [ click on image for larger ]
Now we fix the whites.. Use the dodge tool, set it to highlights and use a small brush and exposure to whiten the eyes and teeth. Do this slowly because you don't want to over do it (not that its overdone already) and make it look freaky.

 [ click on image for larger ]
Reduce the noise again. Now comes the fun bit. Sharpen it again but this time use a radius of 30 px. You can increase or decrease it a little depending on how you like it and WAALAAA!!
 [ click on image for larger ]
What I did next was reduce the noise again and sharpen it to 1.5 px radius just to clean it up a little. And then the usual tweaking of levels, saturation and other bits and pieces.
So there you have it, hope you likes but mostly understand. Write in the comment box if you have questions, but don't say it didn't work when you do it. Remember.. DON'T BLAME THE TECHNIQUE!! Hehe..
| One other thing.. |
Do tell me if you did one. I'd like to see the outcome..

7 comments:
U da man !!! Luv ur tutorial bro. Been admiring ur madame tussaud waxlike photo quietly.
Dude ur the best...another great tutorial. Ani baru checher (teacher) :P
OOF... Your the BEST.. Thanks.. THANKS..THANKSSS.. I almost burst into tears.. hehehe
Thanks for the tutorial Bro... Nearly got it... but still need to practice a lot...
No problem guys.. I've shown you how its done, now show me what you did with it..
Post a Comment